Create, Edit, and Start Phases (and Update Requirement Statuses)
Project > Phase
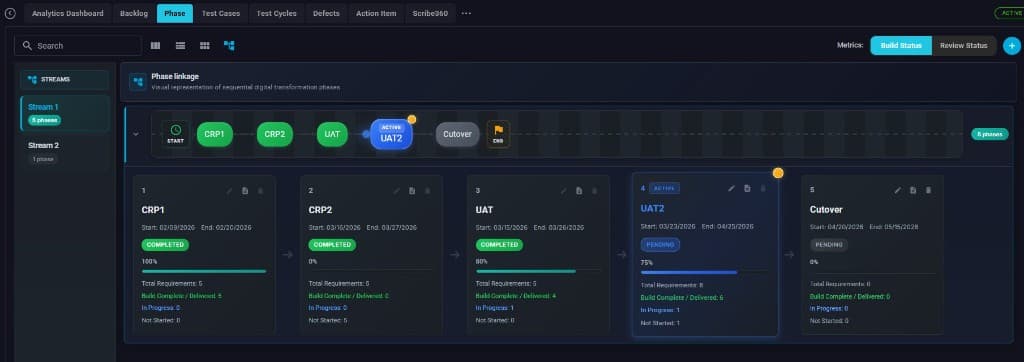
- Open the Phase workspace for your project
From your project navigation, select the "Phase" tab to view the phase timeline/board for the selected stream.

- Start adding a new phase
Click the plus (+) button on the right side of the Phase view to add a new phase.

- Fill in phase details and create the phase
In the "Add Phase" modal, enter the Phase Name, Status, Predecessor (if applicable), Start Date, End Date, and any Tags/Goal. Click the create/confirm button to save the new phase.

- Edit an existing phase (update name, dates, or metadata)
Click on the edit phase icon (under actions) to update fields like Phase Name, Status, Predecessor, and dates, then click the save (disk) icon to apply changes.
- Repeat edits for other phases as needed
Open another phase in edit mode, adjust details (for example, CRP3 start/end dates), then save.
- Verify phases appear on the Phase board/timeline
Return to the Phase board to confirm the phases are listed in the stream and visible on the timeline (e.g., CRP1, CRP2, CRP3, SIT, UAT).

- Update Build Status for requirements within a phase
Open a phase (e.g., CRP1) to view its requirements. In the Build Status column, open the dropdown for a requirement and select the new status (Not Started, In Progress, Build Complete, Delivered).

- Confirm the Build Status change saved
After selecting a Build Status value, look for the success notification and verify the updated status label appears in the row.
- Complete the current phase and then start the next phase
Navigate to the phase List view. Set status of current phase to 'Completed'. Then start the next phase.

- Start the phase and load/copy requirements from the previous phase
Use the phase start action (or an import workflow) to copy requirements forward. Copying the Build and Review Status for the requirements from the predecessor phase is optional and not set by default. Confirm the operation by watching for the success messages and the requirement rows populating the grid.


- Use Import from Backlog if you need to add more requirements
From the phase requirements view toolbar, click the import control and choose "Import from Backlog" to bring in additional items.

- Return to the Phase board to review progress rollups
Go back to the Phase board to see updated rollups (e.g., completion/progress percentages and counts per phase card).
